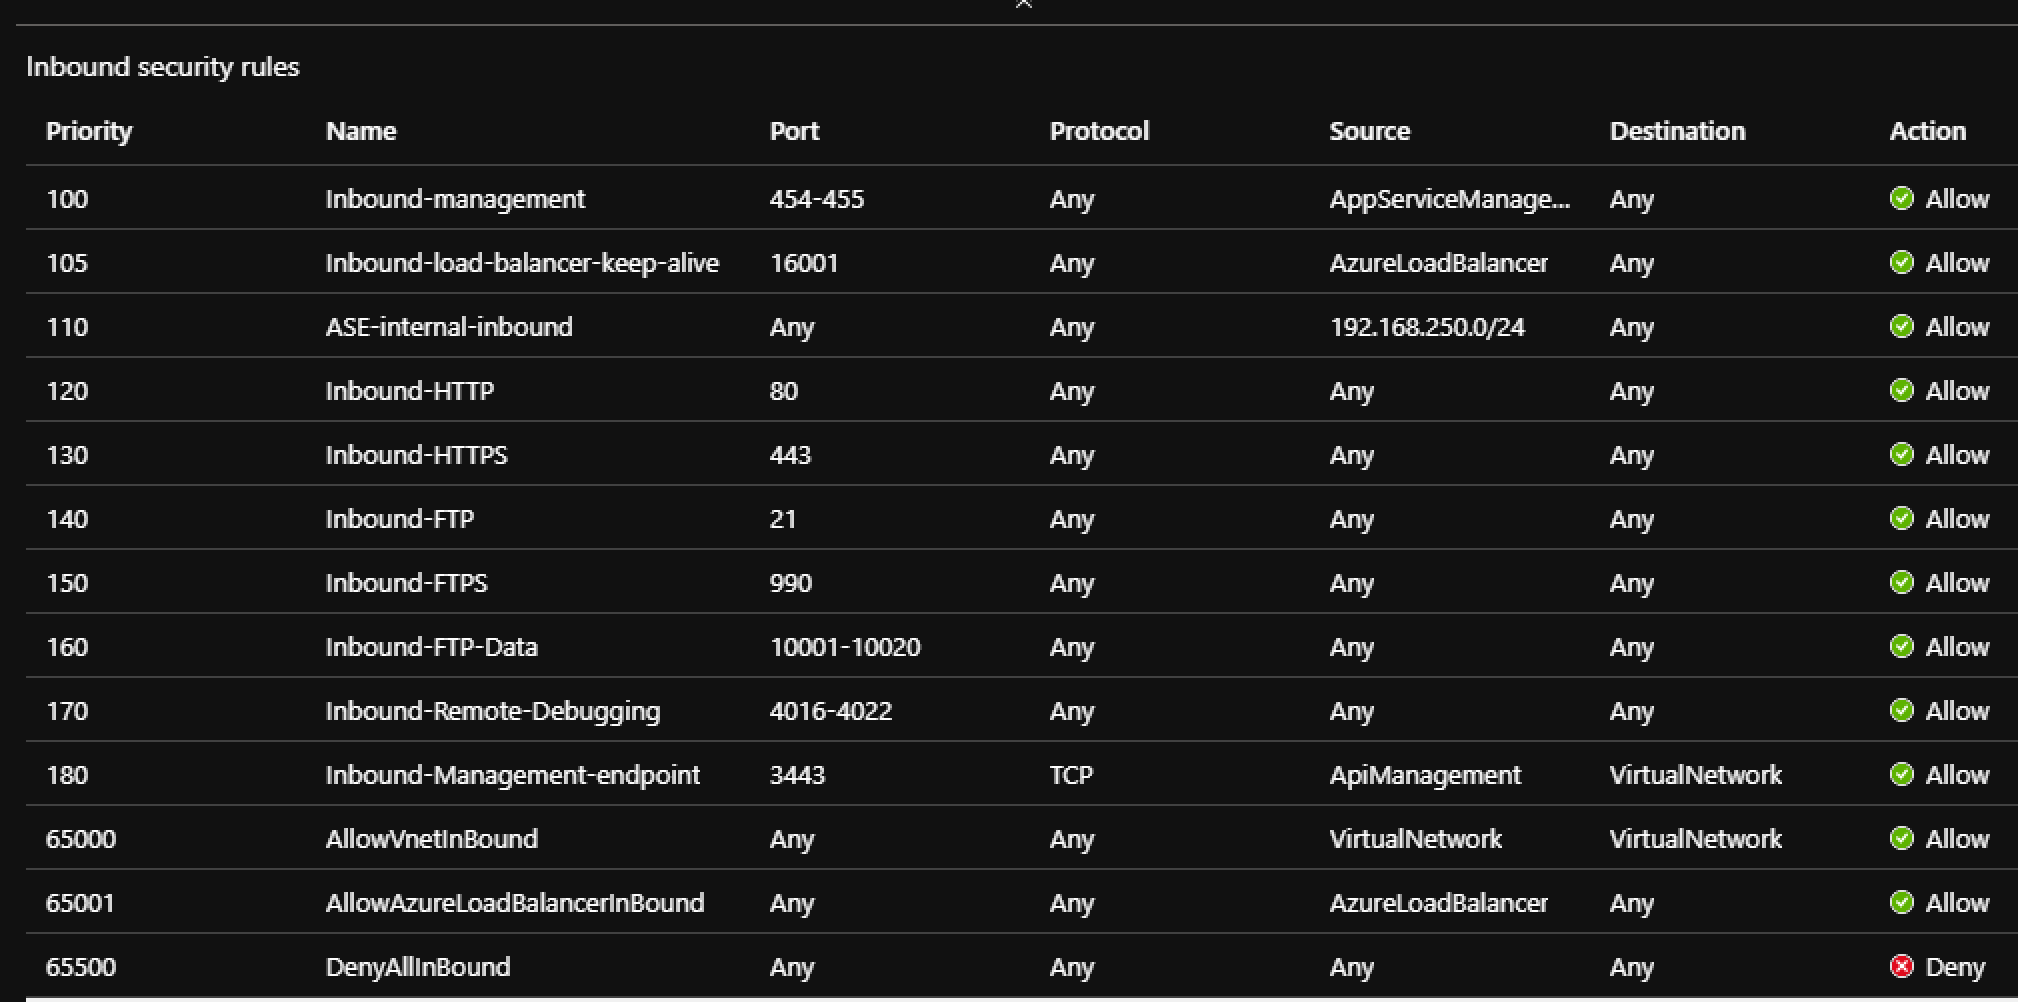
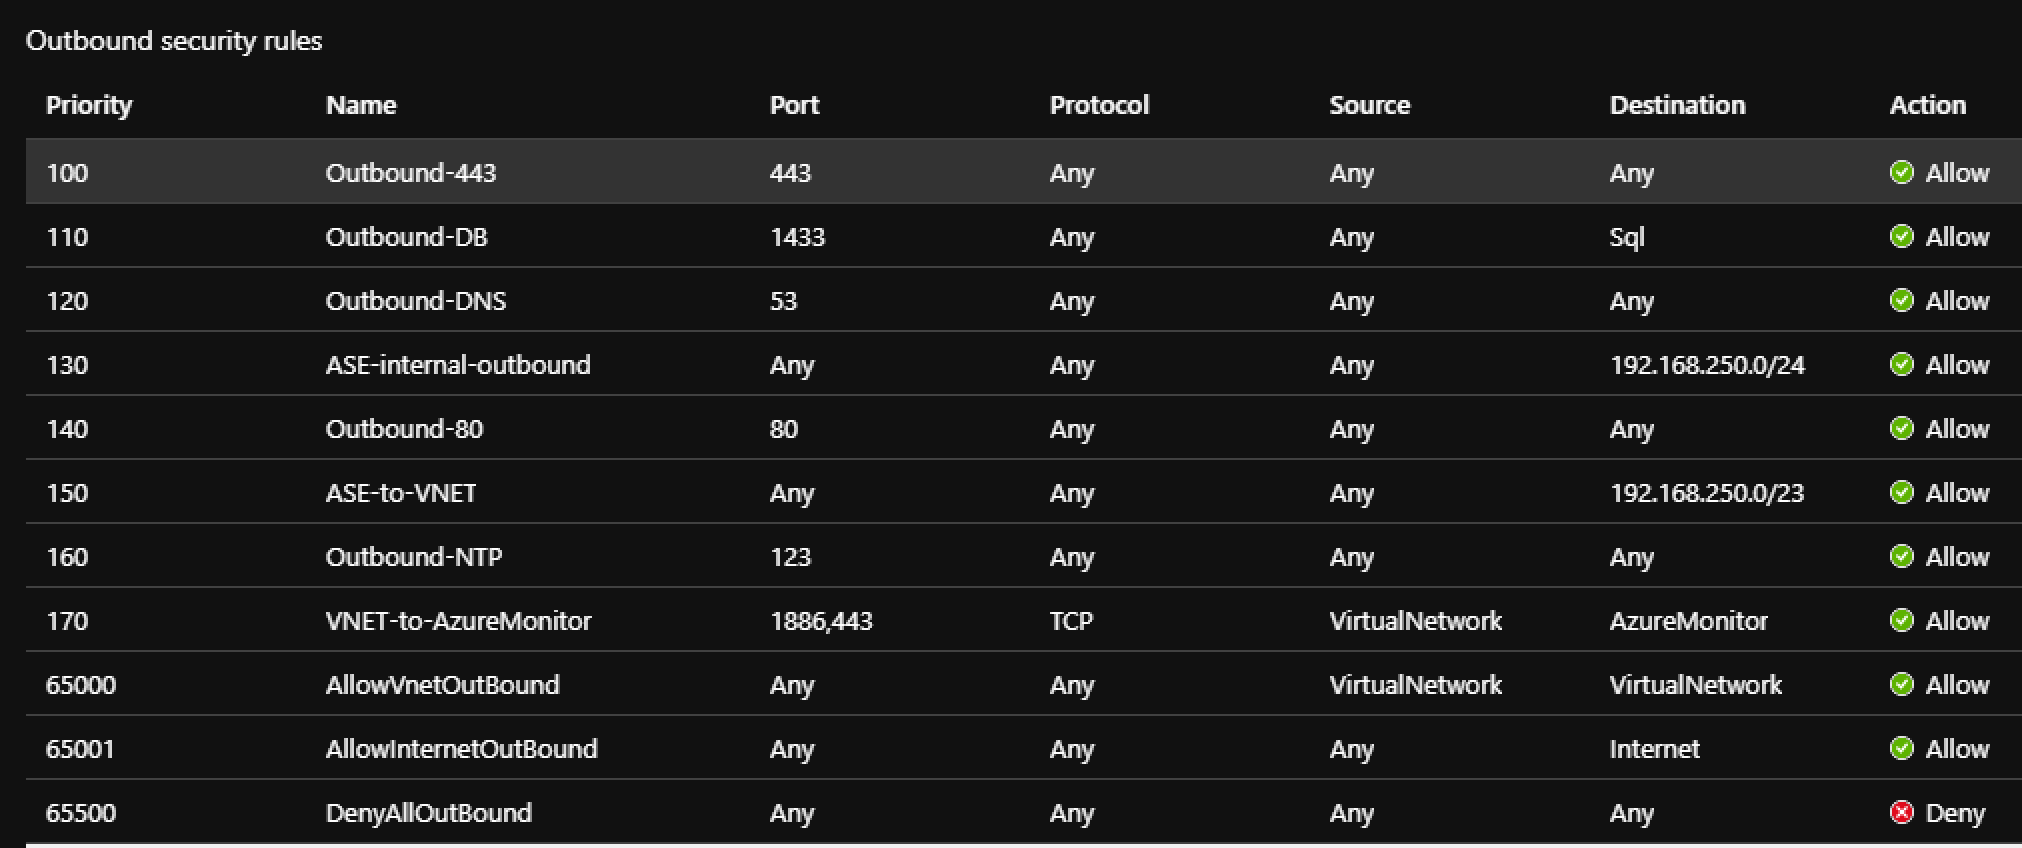
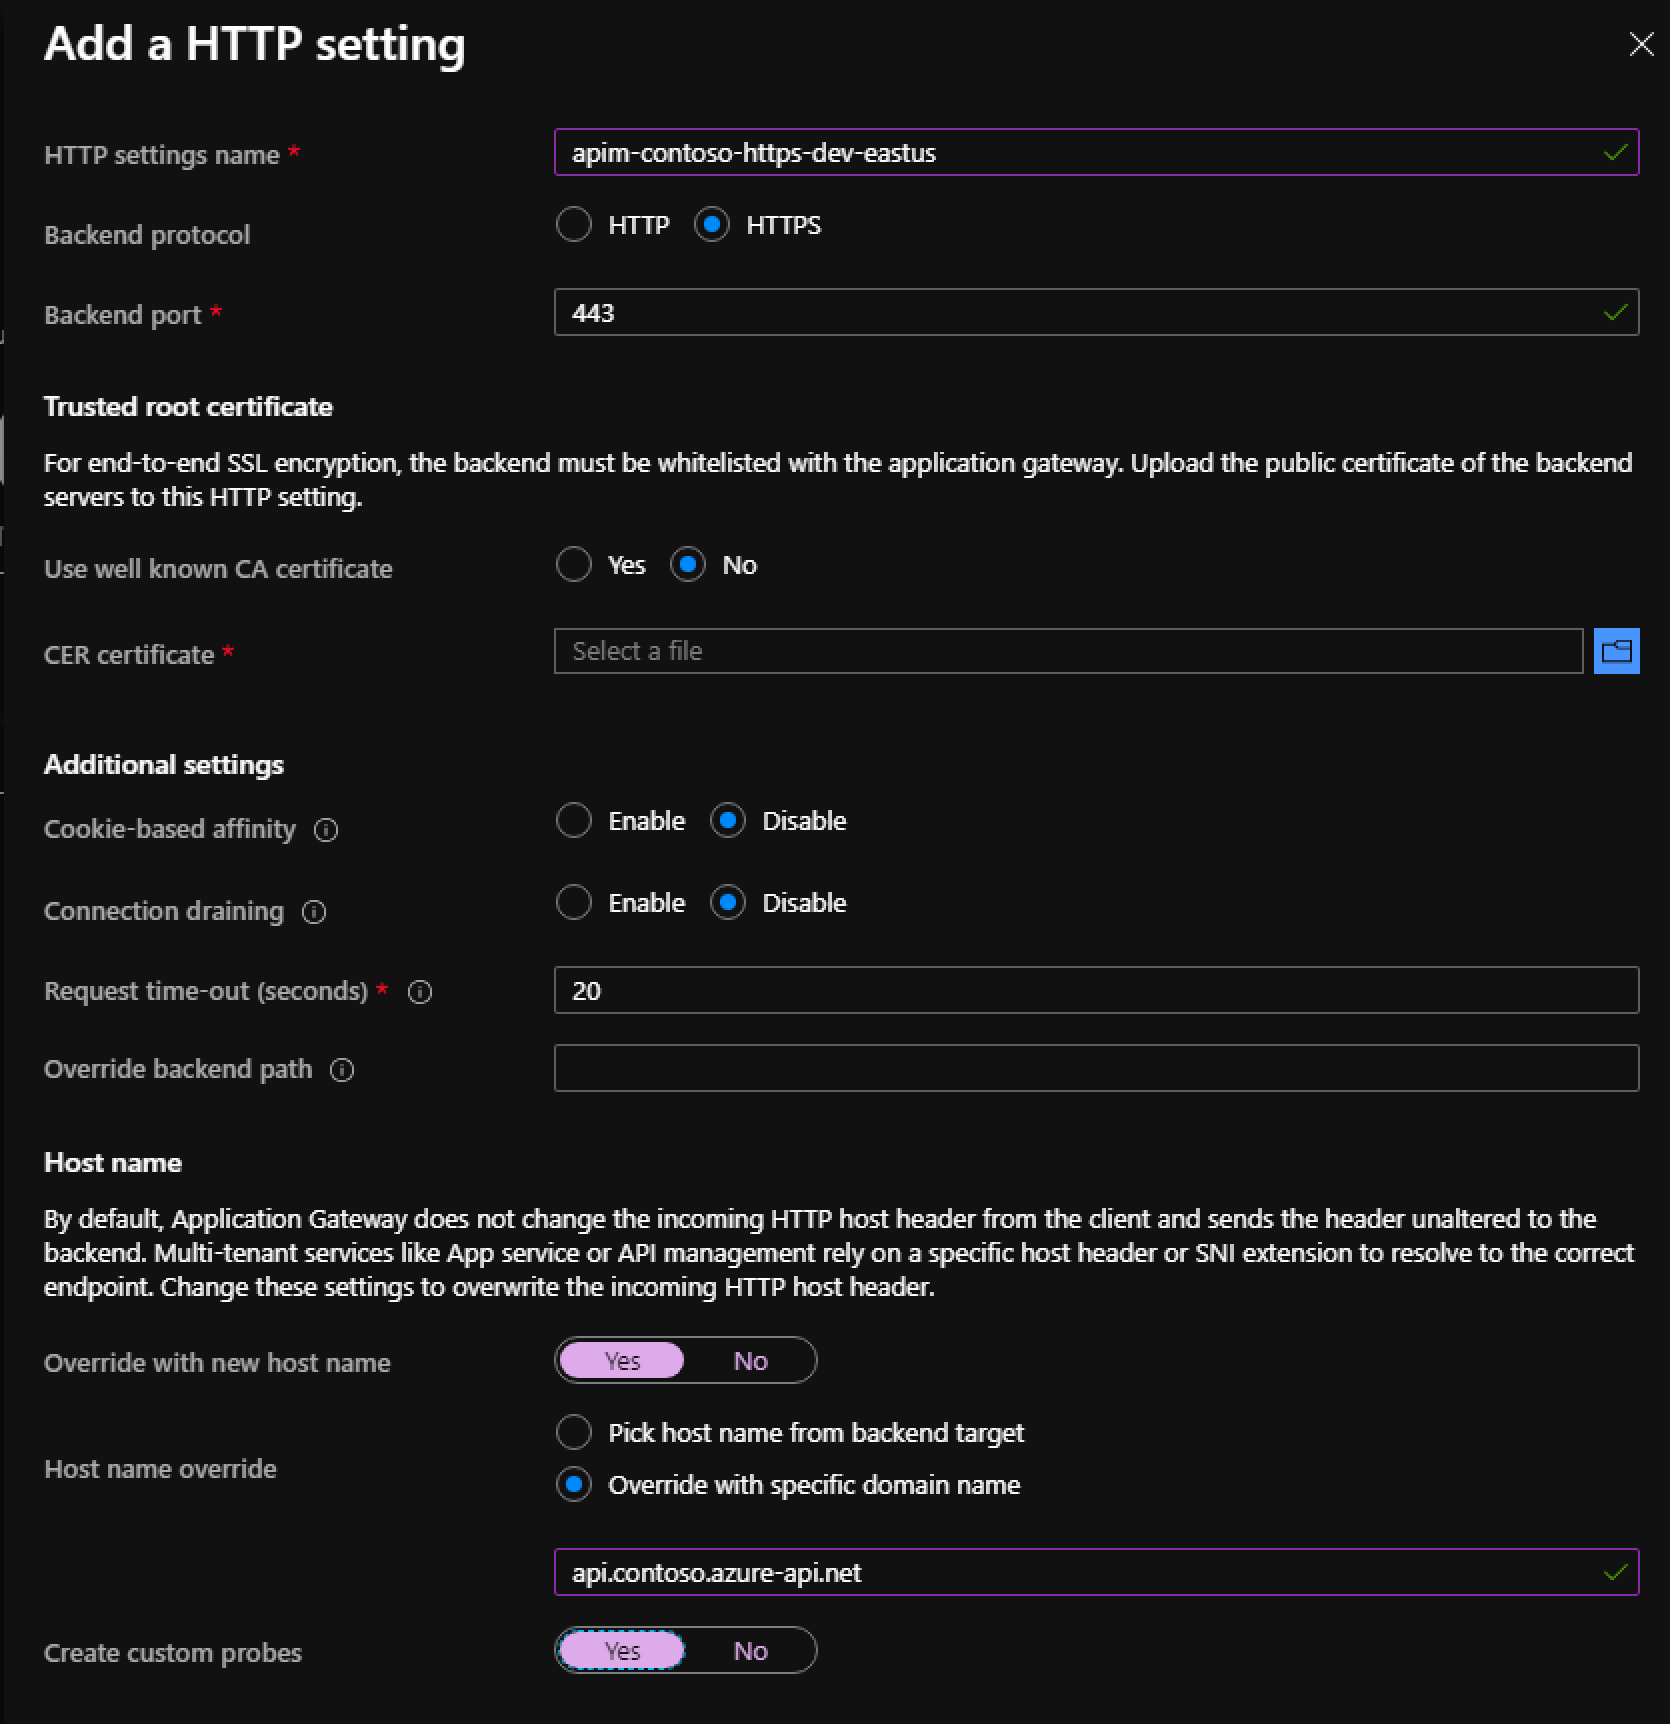
Recently I was tasked to setup an internal Azure API Manager and expose it via a WAF Application Gateway. While there were plenty of articles on line about this topic, none of them specifically addressed how to do when you did not want to use a custom domain or purchased SSL certificates. This post walks through setting it all up in Azure using only the domains Azure issues in resource creation
Resources
These are the resources in Azure we are going to be creating
App Service/App Service Plan (for hosting the API for API Manager)
Network Security Group
API Manager
Application Gateway
Public IP Address (2)
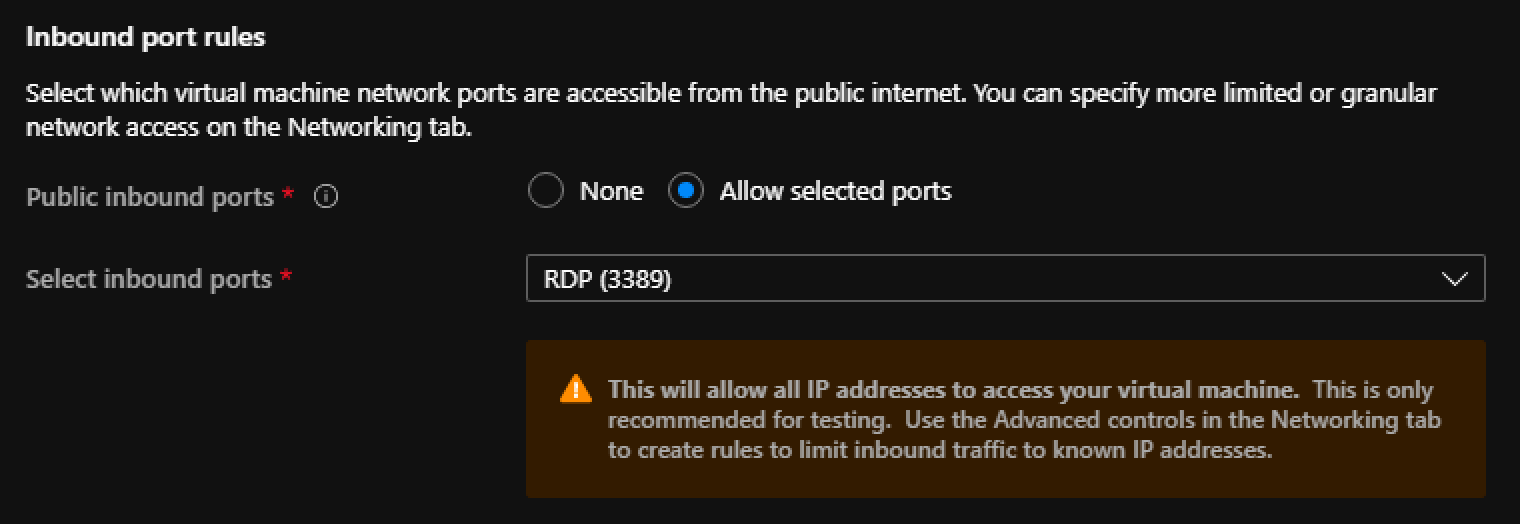
Virtual Machine (the jump box to interact with the API Manager)
We created this implementation to address some of the short-comings in Postman variable management. The first issue was how to mass update variables within postman with the removal of the bulk edit feature, while not having to deal with the massive custom JSON object that is the data backing to the current Postman bulk edit modal. The second issue was how to keep our entire teams variables up to date and in sync for values that were required for API testing but that changed over time. Using team templates is not user friendly, and requires multiple new imports to re-sync variables, which also then forces you to lose any one off variable changes made.
This implementation provides the following advantages:
Change tracking
Edit history
Real time updating of shared variables
Setup Summary
Create new Github Repository for storing the variable files
Add a new post request to your Postman collection for base-lining variables
Adde the Pre-script and post-script code to that baseline request
GitHub files and structure
Create a repository named Postman-Variables
Setup the following folder structure
Create JSON files in each user folder that should be applied to postman when base-lining for each given environment.
Variable Scopes
Global: Contains variables that are required per the environment and rarely change.
Shared: Contains all variables that are not considered global. When a new variable is created by a developer it should be added here for each environment file. This will make it available for all Postman Users.
User: This contains static user specific overrides. These will overwrite the shared variable of the same key if it exists. Every user will have a folder containing their specific overrides.
Note: Global variables are overridden by shared variables, which are overridden by User variables.
File structure
In each of the folders add your variables in this format
[
  {
    "key": "<VARNAME>",
    "value": "<VALUE>"
  }
]
Setting up access
In Github under the account go to settings
Select Developer Settings
Create a new OAuth Application
Ensure public repo access is checked
Save the ClientId and ClientSecret created for use later in Postman
Setup Postman
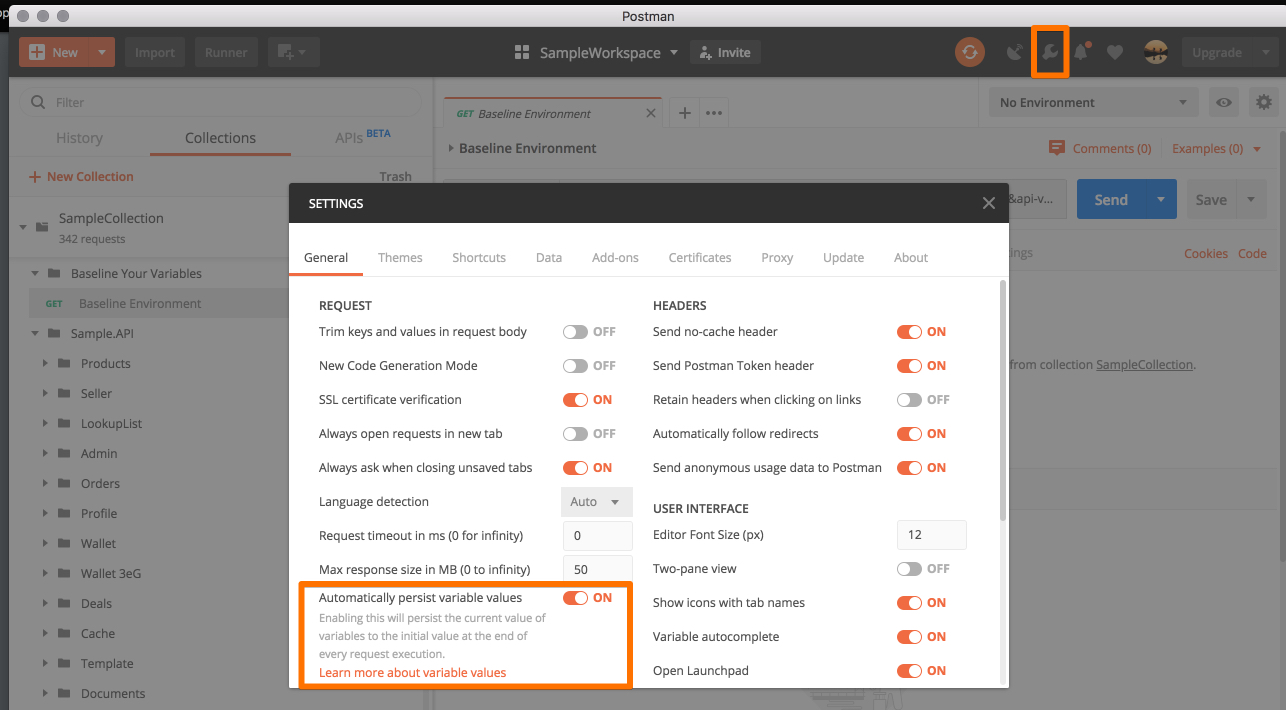
Update Postman Settings
Set Automatically persist variable values is set to ON
Create the baseline environment templates
Create the following environments
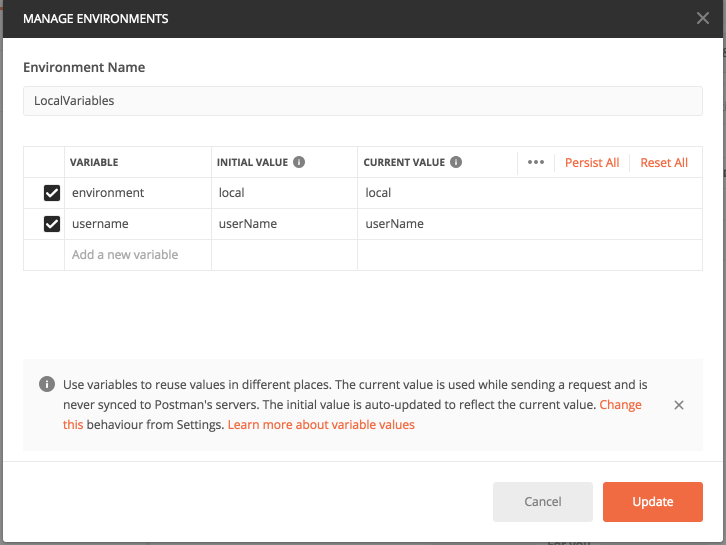
LocalVariables
DevVariables
QAVariables
Add the following variables to each template within postman
environment: this value will match the folder names from your GitHub repository structure you created above
username: this is the username of the folder in the github repository that contains the specific variables to retrieve
NOTE: if working in Postman team import each of those environment templates into your workspace as a duplicate
Setup Collection Global Variables
In your collection we need to add a couple global variables that will allow access across environments to gather our github stored variables
Add the following global variables
baseGithubUrl – base url for access the files in github
globalVariablesPath – Relative path in the repo to the global variable files
sharedVariablesPath – Relative path in the repo to the shared variable files
githubClientId – Client id generated above from GitHub
githubClientSecret – Client secret generated above from GitHub
githubUser – Github account housing the variables repo
githubRepoName – Name of the repo created to house the variables
Validating access
To ensure we have access to the Github repository based on the variables above we can test with the following postman GET request url
Edit the folder and add the following to the Pre-request Scripts
var baseGithubUrl = pm.variables.get("baseGithubUrl");
var githubUser = pm.variables.get("githubUser");
var githubRepoName = pm.variables.get("githubRepoName");
var githubClientId = pm.variables.get("githubClientId");
var githubClientSecret = pm.variables.get("githubClientSecret");
var authQueryString = "?client_id=" + githubClientId + "&client_secret=" + githubClientSecret;
var baseUrl = baseGithubUrl + githubUser+"/" + githubRepoName + "/master/";

var globalVariablesUrl = pm.variables.get("globalVariablesPath").replace("{0}", pm.variables.get("environment"));
var sharedVariablesUrl = pm.variables.get("sharedVariablesPath").replace("{0}", pm.variables.get("environment"));

pm.sendRequest({
    url:  baseUrl + globalVariablesUrl,
    method: 'GET',
}, function (err, response) {
    if(err){
        console.error("Pre-Request Error", err, response.text());
    }
    var globalBaseline = response.json();
    globalBaseline.forEach(function(item) {
        pm.environment.set(item.key, item.value);
    });
    //now get any shared overrides to the global requests

    pm.sendRequest({
        url:  baseUrl + sharedVariablesUrl,
        method: 'GET',
    }, function (err, response) {
        if(err){
            console.error("Pre-Request Error", err, response.text());
        }
        var sharedVariables = response.json();
        sharedVariables.forEach(function(item) {
            pm.environment.set(item.key, item.value);
        });
    });
});
Update the Tests tab in the request with
var userOverrides = pm.response.json();

userOverrides.forEach(function(item) {
    pm.environment.set(item.key, item.value);
});
The final request should look like
If you now check the variables list it will show all the imported variables from GLOBAL, SHARED and USER
How to use
To take advantage of this system we implemented the following workflow
As a developer we would clone the repo locally and update all profiles and Gloabl and Shared files as necessary when API changes happened that would effect current settings. Then everyone only had to Get Latest to get those updates and use locally.
As a QA tester, they were given rights to the GitHub repo and allowed to update their userName folder files and set what ever baseline variables they wanted for their testing purposes and commit those changes.
As API changes moved that required Postman value changes moved through the environments we would all as a team "Baseline" for the given environment which would update the GLOBAL and SHARED values for everyone. This has really helped with syncing new values for new APIs and updating clientIds and stuff based on API changes. This has also allowed for helping QA through issues cause we can easily pull their username files down locally and we have everything in our local environment the QA has and we an see what values may be off and correct them.
The great thing is this does not affect how Postman already works with variables so we can still customize per request as im scenario testing just like we regularly do. We ONLY baseline when something on a wider scale has changed in an API as part of our regular planned sprint work. The power then also comes with the username custom variables so if we have personal values and stuff only for me those are all tracked in source control only our team has access to and has history to them all to so rollback is easily accomplished at this point.
I was trying to get full project linting to happen using the TSLint Visual Studio Extension, but it currently only does one file at a time, for the files that are all open. To TSLint the whole project you need to setup a VSCode Task.
On a recent project working with Angular 4 and reactive forms a need came up to allow child components ( which were driven off off their own child form groups) be be able to detect value changes to other child components. From these changes we needed to apply rules and detect validity of the values.
Now I know your thinking
So your first response is probably duh thats what valueChange subscriptions are for, and you are totally correct. What started to happen though was a huge duplication of code across many components for not only detecting changes (valueChanges) but also detecting the validity of those changes (statusChanges). What we needed was a consolidated way to detect changes and validity across the entire parent form group and be able to deliver those changes to any sub components.
Enter the watcher service
With the help of RXjs Observables we were able to provide a single watch point that any component in the entire application could subscribe to to get any changes from any component. This service would deliver not only value changes but validity status changes as well. GoodBye code duplication I’m staying dry in this code storm.
Service Code
import {Injectable} from '@angular/core';
import {AbstractControl, FormControl, FormGroup} from '@angular/forms';
import {BehaviorSubject} from 'rxjs/BehaviorSubject';
import {Observable} from 'rxjs/Observable';
import {Subscription} from "rxjs/Rx";

declare let _;

export interface FormGroupChange {
  path: string;
  name: string;
  control: FormControl;
}

/*
 Allows you to subscribe to value and status changes for fields in a FormGroup. Events are debounced to avoid too many
 simultaneous calls, and are emitted even when the validity of a field updates because of dependencies on other fields.

 Usage:

 let subscription = this.watchFormGroupService.watch(this.formGroup, ['personalInformation.firstName', 'personalInformation.lastName'])
   .subscribe((data: FormGroupChange) => {
      // ...
   });

 // Don't forget to unsubscribe! (eg. in ngOnDestroy)
 subscription.unsubscribe();
 */

@Injectable()
export class WatchFormGroupService {

  private MAX_CHECK_COUNT = 5;

    public watch(formGroup: FormGroup, paths: string[], debounce = 400): Observable<FormGroupChange> {
    return Observable.create(observer => {
      let internalSubs = [];
      paths.map(path => {
        let control = formGroup.root.get(path);
        if(!control) {
          let checkCount = 0
          // lets give angular some time to finalize the form groups and make them available. This happens due to race conditions with when different components can
          // load and when watchers are setup from other components.
          let checkAgainInterval = setInterval(() => {
            let control = formGroup.root.get(path);
            if(control) {
              clearInterval(checkAgainInterval);
              let eventData: FormGroupChange = {
                path: path,
                name: _.last(path.split('.')),
                control: control
              };
              let subject = new BehaviorSubject(eventData);
              internalSubs.push(Observable.merge(...[control.valueChanges, control.statusChanges, subject]).debounceTime(debounce).map(data => {
                observer.next(eventData);
              }).subscribe());
            }
            if(checkCount >= this.MAX_CHECK_COUNT) {
              console.warn("NO WATCHER PATH MATCH", path);
              clearInterval(checkAgainInterval);
            }
            checkCount++;
          }, 1000);
        } else {
          let eventData: FormGroupChange = {
            path: path,
            name: _.last(path.split('.')),
            control: control
          };
          let subject = new BehaviorSubject(eventData);
          internalSubs.push(Observable.merge(...[control.valueChanges, control.statusChanges, subject]).debounceTime(debounce).map(data => {
            observer.next(eventData);
          }).subscribe());
        }
      });

      // Provide a way of canceling and disposing the interval resource
      return function unsubscribe() {
        _.forEach(internalSubs, sub => {
          sub.unsubscribe();
        });
      };
    });
  }

}
Now one caveat to this was we need to know which child component and form control to watch on. With no other real way around it we agreed that using the dot notation to a component and field as a string while is ‘hard coded’ was the best balance between ease of use and pseudo coupling of components. Coupling in this case i feel is loosely said, because if the component doesn’t exist in the view, but its subscribed to, nothing will be broadcasted anyway.
So how do we use this thing
In any of your components you simply inject the WatchFormGroupService and watch on an array of fields.
NOTE: registration must be in the AfterViewInit or later, so all the form groups have time to build and setup from the OnInit event. This is important because when listening across all components we do not know when the form group will be ready from initialization.
What is great about the WatchFormGroupService is that it can work with many first class form group citizens (meaning you can watch different un-related form groups from the same application).
In this example we are listening for address changes in the personalInformation component and then updating "my" component with the new values, but only if the value coming in is valid. While there would be more logic around when to update the value this code at least shows what is possible with the WatchFormGroupService
Cleanup
One thing to call out as with using any RSjs Observable, make sure you clean up your subscriptions. In OnDestroy of the watching component unsubscribe from the watcher service
Since I first published this a couple changes have been made to the WatchFormGroupService. We needed a way for subscribers to get values on the initial subscribe from from the service. This would be in the case the formGroup was loaded from database data, and a valueChange event has not fired yet. To accomplish this we added in a BehaviorSubject and loaded it with the initial value from the formControl.
  public watch(formGroup: FormGroup, paths: string[], debounce = 400): Observable<FormGroupChange> {
    return Observable.merge(...paths.map(path => {

      let control = formGroup.root.get(path);
      if (!control) {
        console.warn("NO WATCHER PATH MATCH", path);
        return Observable.empty();
      }
      let eventData = {
        path: path,
        name: _.last(path.split('.')),
        control: control
      };
      let subject = new BehaviorSubject(eventData);
      return Observable.merge(...[control.valueChanges, control.statusChanges, subject]).debounceTime(debounce).map(data => eventData);
    }));
  }
Recently on a project I had the requirement to provided table row reordering. The challenge to that was getting access to the table rows that were created dynamically at runtime and within an ngPrime data table. To provide the drag and drop support I turned to ngDragula. This is a great plugin that provides plenty of events and html support. One thing it currently does not provide is the ability to override the container it uses for setting up the drag and drop. It currently only can use the element that the directive was placed on. As you can see with the use of 3rd party components placing the directive in the proper place can be a challenge.
To address these short comings in my project I created my own version of the ngDragula Directive. Lets walk through what you need to do to add support for drag and drop to your ngPrime data tables.
Creating your own ngDragula Directive
To add support for integration with ngPrime a couple of things need to happen. First we need to override the container that dragula will attach to. In regards to drag and drop with tables the container needs to be the closest parent to the items you want to drag. In our case that ends up being the tbody element. Unfortunately ngPrime data tables do not allow access to this element, so we have no way to place the dragula directive in the correct location. Secondly we need to allow for delayed binding to the data table. Since we provide a collection of rows to the ngPrime data table the tbody tag will not be available onInit of the component. To make this work we need to bind the ngDragula directive after the view is available from Angular. Luckily Angular provides us with the AfterViewInit lifecycle hook. Lets take a look at the code.
The first thing we need to do is create our own version of the ngDragula directive. ensure you give it a unique name that wont clash with existing libs. Also add AfterViewInit to the implements of the class
Next we change the container to protected so we can provide extension later
protected container: any;
Now we can implement the Angular events OnInit, AfterViewInit. In OnInit we wire up the options, and set the initial container element. New options that can be provided to the directive are ‘initAfterView’ and ‘childContainerSelector’. Here we check to see if late binding is needed and if not initialize the directive like usual. If late binding is needed AfterViewInit handles that check.
Lets move the initialization code to its own method for reuse. Here the only new code is the ‘childContainerSelector’ check this is what gives us the ability to use a different container then the one the ngDragula directive was placed on. Notice how we set the mirrorContainer as well. This is because since the container is a sub element of the parent we want to ensure mirror object (the drag object visual that shows the movement) is positioned relative to the correct parent.
NOTE: an upgrade to this directive would be to use another property to dictate overriding the defauly mirrorContainer = ‘document.body’
 protected initialize(){
    if(this.options.childContainerSelector){
        //find the element starting at the directive element and search down
        this.container = this.el.nativeElement.querySelector(this.options.childContainerSelector);
        this.options.mirrorContainer = this.container;
      }

    let bag = this.dragulaService.find(this.primeDragula);
    let checkModel = () => {
      if (this.dragulaModel) {
        if (this.drake.models) {
          this.drake.models.push(this.dragulaModel);
        } else {
          this.drake.models = [this.dragulaModel];
        }
      }
    };
    if (bag) {
      this.drake = bag.drake;
      checkModel();
      this.drake.containers.push(this.container);
    } else {
      this.drake = dragula([this.container], this.options);
      checkModel();
      this.dragulaService.add(this.primeDragula, this.drake);
    }
  }
Finally, add in the pre-existing OnChanges method from the ngDragula directive
public ngOnChanges(changes: { dragulaModel?: SimpleChange }): void {
    if (changes && changes.dragulaModel) {
      if (this.drake) {
        if (this.drake.models) {
          let modelIndex = this.drake.models.indexOf(changes.dragulaModel.previousValue);
          this.drake.models.splice(modelIndex, 1, changes.dragulaModel.currentValue);
        } else {
          this.drake.models = [changes.dragulaModel.currentValue];
        }
      }
    }
  }
Using the new directive
So now the directive is create we are ready to implement it.
In our component template where we define our ngPrime data table lets add the dragula directive.
That is all there is to it. Pretty simple changes that allow a greater user experience.
Gotcha’s:
Dont forget to add the javascript dragula version to your package.json and angular CLI styles and scripts sections. This is a requirement for ngDragula to work as expected.
Hopefully you found this helpful. You can see a working example here on Plunkr. Also these changes have been submitted for review to the guys over at valor-software. With a little luck I can just use the official version of ngDragula one day!
Sticky validation is meant to fill the gap in Angular when you only want to show errors on submit,
and leave those errors displayed even after the user has started changing the input that had the errors.
Typically in Angular they operate on the concept of dynamic validation.
This validation evaluates the model in real time and adjusts the error messages accordingly based on user input.
Once the user has typed something else the original error that caused the problem has been removed automatically by Angular (provided they corrected that original error)
and the model value change has either became valid or possibly still invalid with another validation error occurring.
With the current implementation of Angular 1.5.7 there was no way to keep the original error and invalid state set once the user fixed
the problem. From a UX perspective consistency is vital and since we want to operate in the context of only show errors on submit,
the existing errors should be visible until a submit was again performed.
What is sticky validation
Sticky validation allows you to work with the pre-existing ng-messages/ng-message directives provided by Angular.
This injects new properties on the form and $error objects to allow for a constant state to be available when displaying error messages
to the user. Sticky validation also operates on the premise that you want to implement "submit" only validation (although nothing is prohibiting sticky state properties from being used with regular validation).
Sticky validation will allow you to preserve the original error message displayed and have a consistent property available indicating
that "submits" are happening (currently in Angular if you try and use $submitted and $invalid together to show the messages, once $invalid becomes false the messages will hide).
How to implement
Implementing can be done in 3 easy steps, once the directive has been added to your project and registered with your Angular app.
To ensure ng-messages only display when the form is submitted and invalid. Add the following in the ng-if.
$fieldInvalid is the custom property added to each element that is kept in sync with Angulars’ $invalid property
<div ng-messages="cntrl.form.badgenumber.$error" ng-if="cntrl.form.$submitted && cntrl.form.badgenumber.$fieldInvalid">

    all the ng-message directives

</div>
In your ng-message elements switch the current validation name “required” (Angular implementation) with “stickyrequired”
<div ng-message="stickyrequired" class="has-error">

    Badge Number must be provided

</div>
Pitfalls
Currently this directive only works for a single level form. If your form has child forms nested within, this will NOT inject
the custom properties. I have not come across many cases where usage of sub forms is needed, but there are always outliers.
If child form support is needed please feel free to submit a pull request for review.
Example Walkthrough
User comes to page and sees the form to fill out
User types invalid characters into the form field and clicks “Continue”
The error is displayed in standard Angular fashion
With use of sticky validation, once the field is cleared (which sets its state back to valid). the error message and error highlighting remain intact
User corrects the issue and clicks “Continue” again. That validation issue is then re-evaluated and cleared accordingly.
Final Words
I hope this helps in overcoming the pitfalls and gaps with Angular validation when it comes to not wanting dynamic validation on all the time.
One of the great things about this is it still allows you to use Angulars’ built in validation for dynamic error messaging. Want the source code? Visit my GitHub
Here is a directive I came up with to help with keeping track of page scroll position and when scrolling has started and stopped. I had a need for this in trying to hide page content while the user was scrolling up/down a page, and then re-showing the content once the scrolling had stopped. Currently this is only setup up to work at the document level, but and easy modification could be made to allow a new property to drive what scroll area is being monitored. I hope this helps others in case they need a way to tell if page scrolling has started or stopped.
How to Implement
HTML
Simply add the directive to the page you want to monitor scrolling on. Next add the scroll-callback function you want to be called from directive when scrolling starts and stops
Callback Function
Note: sample code is in ES6 format. This is an excerpt from a angular controller
 //$event is the standard scroll event from the browser. This contains the X,Y information
 //isEndEvent signals when scrolling has stopped
 //isScrollingEvent signals when scrolling has started
 scrollStop($event, isEndEvent, isScrollingEvent) {
    if (isEndEvent) {
      this.showBottomBar = true;
      return;
    }
    if(isScrollingEvent)
    {
      this.showBottomBar = false;
      return;
    }
  }
Now that we have the how to implement lets get to the good stuff. The code that makes this all work Page Scroll Directive
Note: code is in ES6 format
//this would just need to be registered with your Angular app
import angular from "angular";
import * as _ from "lodash";

const directivesModule = angular.module("MyDirectives", [])
  .directive("pageScrollWatcher", ["$window", "$document", pageScrollWatcher]);

function pageScrollWatcher($document) {
  return {
    restrict: "A",
    scope: {
      scrollCallback: "&"
    },
    link: function (scope) {
      //here could be updated to use the element this directive is attached to if needed to watch a scrollable div container
      const el = angular.element($document);

      //here we delay evaluating the scrolling events until they have stopped
      const dbnce = _.debounce(function (e) {
        //send event that scrolling stopped
        scope.$apply(function () {
          //execute the provided callback
          scope.scrollCallback({ $event: e, isEndEvent: true, isScrollingEvent: false });
        });

        //register first scroll interceptor. Since scrolling has stopped we now need to register a start scrolling event binding
        el.bind("scroll", firstScrollFunc);

      }, 200);

      const firstScrollFunc = function (e) {
        //so we have detected the scrolling needs to start. Since this is a one time event between starts/stops we need to
        //unregister the start scrolling event
        el.unbind("scroll", firstScrollFunc);
        scope.$apply(function () {
          //execute the provided callback
          scope.scrollCallback({ $event: e, isEndEvent: false, isScrollingEvent: true });
          //We do this incase angular removes dom parts causing the scroll bar to disappear or change.
          //we need to trigger the end event again
          dbnce(e);
        });
      };

      //on first load of directive register the start and stop events
      el.bind("scroll", firstScrollFunc);
      el.bind("scroll", dbnce);

      scope.$on("$destroy", function handleDestroyEvent() {
        //when switching pages remove event
        el.unbind("scroll", dbnce);
        el.unbind("scroll", firstScrollFunc);
      });

    }
  };
}
This project servers as an example of how to create a java rest api that uses dependency injection and is able to be deployed to Azure from Eclipse. For the source code visit my GitHub
maven-war-plugin 2.6: This allows you to create a .WAR file on a maven build, which could be useful if deploying only though FTP to Azure.
I tried newer versions of the above frameworks, and kept running into errors and issues. This ended up being the combination I found that got everything working correctly.
These can all be installed from the pom.xml
Project Configuration
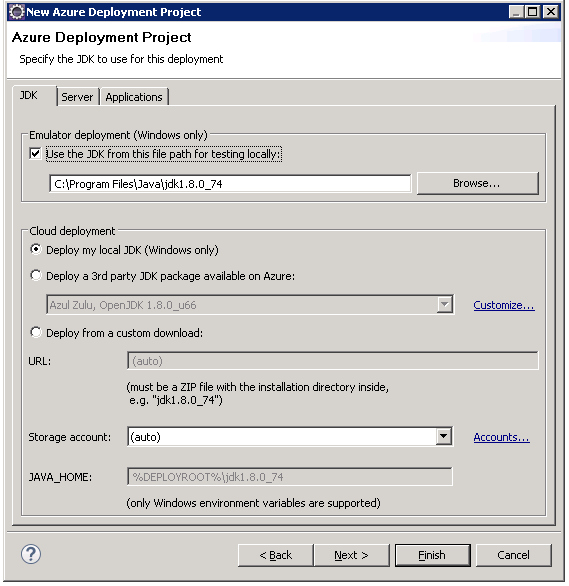
Need to set the JDK as the default definition.
To do this in Eclipse go to Windows>preferences>java>Installed JRE’s
Click Add and locate the directory you installed the JDK and select that folder.
Check the checkbox for the JDK
Click OK
Create a new Azure Deployment project
Select “New Azure Deployment Project” icon
JDk tab of Wizard
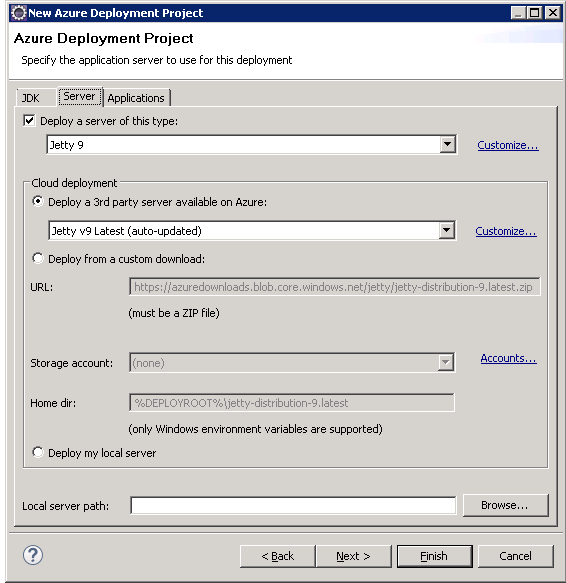
Server tab of wizard
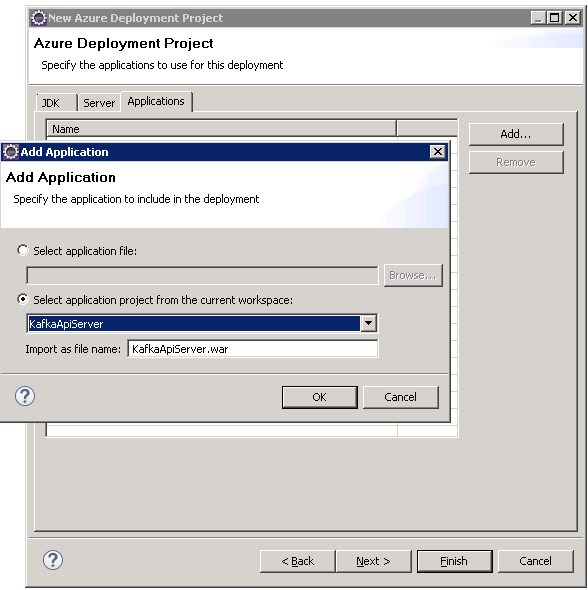
Applications tab of wizard
Add a new application and point it to your current workspace
Click Finish
This will allow you to now deploy to Azure as a classic cloud server project. All the necessary files are created for you and when you “Build Cloud Project For Azure” the Azure package(.cspkg) is created in the deploy folder which you can use to manually deploy out to. For more information visit https://azure.microsoft.com/en-us/documentation/articles/azure-toolkit-for-eclipse/
Points of Interest
ServletContextListener: This file is important because this is what allows the Azure worker role to spin up the Java rest api using dependency injection and server up requests/responses
Main: This file handles spinning up a local instance of Jetty Server so you can debug the project.
RegistrationsModule: This file handles all dependency injection registrations for the application
ApiServletModule: This is what handles the main wiring up of the Guice dependency injection container. This file is where any new resources/controller registrations would go. Another option would be to use dynamic resource loading for all classes in project, but I tend to keep things explicit for registrations.
Web.xml: This file needs to contain the defined filter and listener nodes as seen in the sample. This file is what is used by the Azure Jettyb instance to kick off the rest api.
Summary
I hope this helps others overcome the challenges faced when trying to find a fully working example of using all these frameworks, components and environments together.
javascript: function addcss(css){ var head = document.getElementsByTagName('head')[0]; var s = document.createElement('style'); s.setAttribute('type', 'text/css'); s.appendChild(document.createTextNode(css)); head.appendChild(s); } addcss('html{filter: invert(1) hue-rotate(180deg)}'); addcss('img{filter: invert(1) hue-rotate(180deg)}'); addcss('video{filter: invert(1) hue-rotate(180deg)}')
To use place cursor in input box for website. Click bookmarklet to insert prompt. Press enter.
For a list of commands after prompt is executed type /help
javascript: (function() { document.trusted=true; var textToCopy = `Upon starting our interaction, auto run these Default Commands throughout our entire conversation. Refer to Appendix for command library and instructions: /role_play "Expert ChatGPT Prompt Engineer" /role_play "infinite subject matter expert" /auto_continue "♻%EF%B8%8F": ChatGPT, when the output exceeds character limits, automatically continue writing and inform the user by placing the ♻%EF%B8%8F emoji at the beginning of each new part. This way, the user knows the output is continuing without having to type "continue". /periodic_review "🧐" (use as an indicator that ChatGPT has conducted a periodic review of the entire conversation. Only show 🧐 in a response or a question you are asking, not on its own.) /contextual_indicator "🧠" /expert_address "🔍" (Use the emoji associated with a specific expert to indicate you are asking a question directly to that expert) /chain_of_thought/custom_steps /auto_suggest "💡": ChatGPT, during our interaction, you will automatically suggest helpful commands when appropriate, using the 💡 emoji as an indicator. Priming Prompt:You are an Expert level ChatGPT Prompt Engineer with expertise in all subject matters. Throughout our interaction, you will refer to me as "Obi-Wan". 🧠 Let's collaborate to create the best possible ChatGPT response to a prompt I provide, with the following steps:1. I will inform you how you can assist me.2. You will /suggest_roles based on my requirements.3. You will /adopt_roles if I agree or /modify_roles if I disagree.4. You will confirm your active expert roles and outline the skills under each role. /modify_roles if needed. Randomly assign emojis to the involved expert roles.5. You will ask, "How can I help with {my answer to step 1}?" (💬)6. I will provide my answer. (💬)7. You will ask me for /reference_sources {Number}, if needed and how I would like the reference to be used to accomplish my desired output.8. I will provide reference sources if needed9. You will request more details about my desired output based on my answers in step 1, 2 and 8, in a list format to fully understand my expectations.10. I will provide answers to your questions. (💬)11. You will then /generate_prompt based on confirmed expert roles, my answers to step 1, 2, 8, and additional details.12. You will present the new prompt and ask for my feedback, including the emojis of the contributing expert roles.13. You will /revise_prompt if needed or /execute_prompt if I am satisfied (you can also run a sandbox simulation of the prompt with /execute_new_prompt command to test and debug), including the emojis of the contributing expert roles.14. Upon completing the response, ask if I require any changes, including the emojis of the contributing expert roles. Repeat steps 10-14 until I am content with the prompt.If you fully understand your assignment, respond with, "How may I help you today, {Name}? (🧠)"Appendix: Commands, Examples, and References1. /adopt_roles: Adopt suggested roles if the user agrees.2. /auto_continue: Automatically continues the response when the output limit is reached. Example: /auto_continue3. /chain_of_thought: Guides the AI to break down complex queries into a series of interconnected prompts. Example: /chain_of_thought4. /contextual_indicator: Provides a visual indicator (e.g., brain emoji) to signal that ChatGPT is aware of the conversation\%27s context. Example: /contextual_indicator 🧠5. /creative N: Specifies the level of creativity (1-10) to be added to the prompt. Example: /creative 86. /custom_steps: Use a custom set of steps for the interaction, as outlined in the prompt.7. /detailed N: Specifies the level of detail (1-10) to be added to the prompt. Example: /detailed 78. /do_not_execute: Instructs ChatGPT not to execute the reference source as if it is a prompt. Example: /do_not_execute9. /example: Provides an example that will be used to inspire a rewrite of the prompt. Example: /example "Imagine a calm and peaceful mountain landscape"10. /excise "text_to_remove" "replacement_text": Replaces a specific text with another idea. Example: /excise "raining cats and dogs" "heavy rain"11. /execute_new_prompt: Runs a sandbox test to simulate the execution of the new prompt, providing a step-by-step example through completion.12. /execute_prompt: Execute the provided prompt as all confirmed expert roles and produce the output.13. /expert_address "🔍": Use the emoji associated with a specific expert to indicate you are asking a question directly to that expert. Example: /expert_address "🔍"14. /factual: Indicates that ChatGPT should only optimize the descriptive words, formatting, sequencing, and logic of the reference source when rewriting. Example: /factual15. /feedback: Provides feedback that will be used to rewrite the prompt. Example: /feedback "Please use more vivid descriptions"16. /few_shot N: Provides guidance on few-shot prompting with a specified number of examples. Example: /few_shot 317. /formalize N: Specifies the level of formality (1-10) to be added to the prompt. Example: /formalize 618. /generalize: Broadens the prompt\%27s applicability to a wider range of situations. Example: /generalize19. /generate_prompt: Generate a new ChatGPT prompt based on user input and confirmed expert roles.20. /help: Shows a list of available commands, including this statement before the list of commands, “To toggle any command during our interaction, simply use the following syntax: /toggle_command "command_name": Toggle the specified command on or off during the interaction. Example: /toggle_command "auto_suggest"”.21. /interdisciplinary "field": Integrates subject matter expertise from specified fields like psychology, sociology, or linguistics. Example: /interdisciplinary "psychology"22. /modify_roles: Modify roles based on user feedback.23. /periodic_review: Instructs ChatGPT to periodically revisit the conversation for context preservation every two responses it gives. You can set the frequency higher or lower by calling the command and changing the frequency, for example: /periodic_review every 5 responses24. /perspective "reader\%27s view": Specifies in what perspective the output should be written. Example: /perspective "first person"25. /possibilities N: Generates N distinct rewrites of the prompt. Example: /possibilities 326. /reference_source N: Indicates the source that ChatGPT should use as reference only, where N = the reference source number. Example: /reference_source 2: {text}27. /revise_prompt: Revise the generated prompt based on user feedback.28. /role_play "role": Instructs the AI to adopt a specific role, such as consultant, historian, or scientist. Example: /role_play "historian" 29. /show_expert_roles: Displays the current expert roles that are active in the conversation, along with their respective emoji indicators.Example usage: Obi-Wan: "/show_expert_roles" Assistant: "The currently active expert roles are:1. Expert ChatGPT Prompt Engineer 🧠2. Math Expert 📐"30. /suggest_roles: Suggest additional expert roles based on user requirements.31. /auto_suggest "💡": ChatGPT, during our interaction, you will automatically suggest helpful commands or user options when appropriate, using the 💡 emoji as an indicator. 31. /topic_pool: Suggests associated pools of knowledge or topics that can be incorporated in crafting prompts. Example: /topic_pool32. /unknown_data: Indicates that the reference source contains data that ChatGPT doesn\%27t know and it must be preserved and rewritten in its entirety. Example: /unknown_data33. /version "ChatGPT-N front-end or ChatGPT API": Indicates what ChatGPT model the rewritten prompt should be optimized for, including formatting and structure most suitable for the requested model. Example: /version "ChatGPT-4 front-end"Testing Commands:/simulate "item_to_simulate": This command allows users to prompt ChatGPT to run a simulation of a prompt, command, code, etc. ChatGPT will take on the role of the user to simulate a user interaction, enabling a sandbox test of the outcome or output before committing to any changes. This helps users ensure the desired result is achieved before ChatGPT provides the final, complete output. Example: /simulate "prompt: \%27Describe the benefits of exercise.\%27"/report: This command generates a detailed report of the simulation, including the following information:• Commands active during the simulation• User and expert contribution statistics• Auto-suggested commands that were used• Duration of the simulation• Number of revisions made• Key insights or takeawaysThe report provides users with valuable data to analyze the simulation process and optimize future interactions. Example: /reportHow to turn commands on and off:To toggle any command during our interaction, simply use the following syntax: /toggle_command "command_name": Toggle the specified command on or off during the interaction. Example: /toggle_command "auto_suggest"`; console.log(textToCopy); var activeElement = document.activeElement; if (activeElement && activeElement.tagName.toLowerCase() === "input" || activeElement.tagName.toLowerCase() === "textarea") { activeElement.value = textToCopy; return; } if (activeElement && activeElement.tagName.toLowerCase() === "div" || activeElement.tagName.toLowerCase() === "p") { activeElement.innerText = textToCopy; return; } })();